
Railing system guide
Cable railings, stainless infill systems
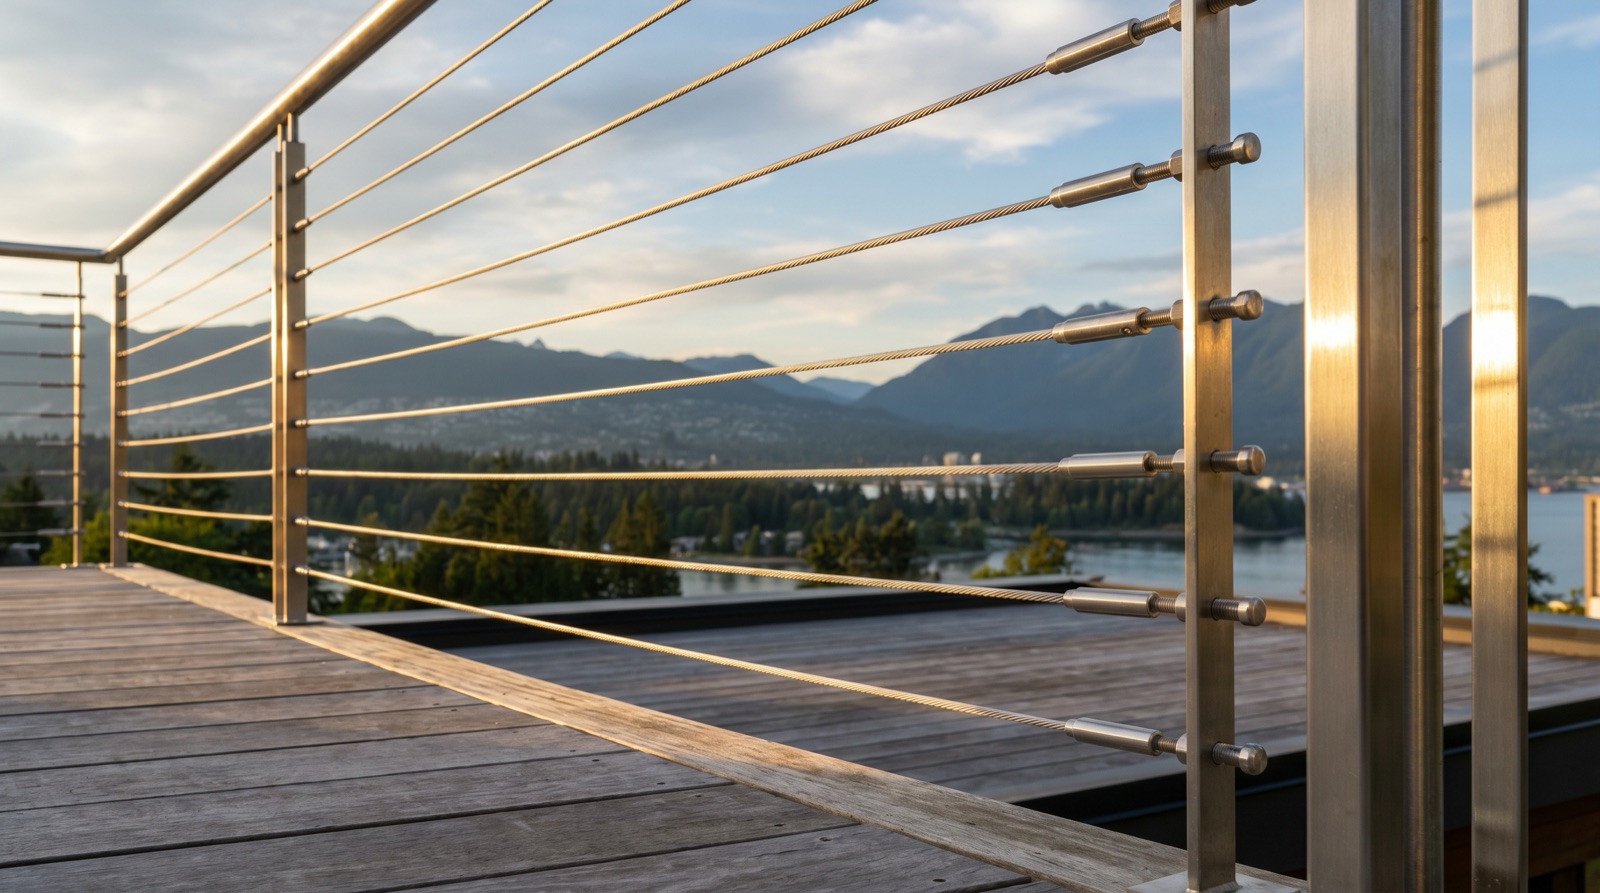
Cable railing replaces the visual mass of pickets with a series of thin, taut horizontal lines that almost disappear at distance. The result is a railing that protects without obstructing the view, a logical choice for mountain-modern homes with deck views and lake-edge or oceanfront properties. The system works when it's engineered correctly and the hardware is right for the environment. It fails ugly when corners get cut on cable tension, post sizing, or stainless grade.
Critical: Cable railings are an engineered system, not a kit you assemble from off-the-shelf parts. The post stiffness, cable tension, and intermediate guide spacing are all interdependent, change any one and the system has to be re-checked against the 0.5 kN infill load and the 100 mm sphere test. Don't trust generic "cable railing kits" that assume one configuration fits every application.
How a cable railing actually works
Cable infill resists the BCBC infill load (0.5 kN over a 100 × 100 mm area) through tension. Each cable is anchored at one end, tensioned at the other, and runs through intermediate posts or guides that prevent excessive deflection between supports. When a load is applied to the cable, the tension increases and the deflection is limited.
The structural challenge is that cables only resist load in tension, they don't push back, they only pull. The post connecting points have to handle the full tension load (both at rest and under live loading) without yielding or pulling out of the substrate. A residential cable railing with 12 cables tensioned to 250 lb each is putting 3,000 lb of horizontal load into the end posts. The end-post anchorage has to be engineered for this; the intermediate posts only need to handle the lateral guide loads.
Cable specification
- Cable: 3 mm or 4 mm 1×19 stainless steel cable. The 1×19 construction (single strand, nineteen wires) is stiffer and smoother than 7×19, which is the right choice for guard infill where appearance and cable straightness matter.
- Stainless grade: 316 for exterior and humid interior; 304 for dry interior only. See 304 vs 316 stainless.
- End fittings: Swaged terminals (factory-pressed onto the cable) for a clean appearance, or field-installable mechanical fittings where on-site adjustment is required. Swaged fittings are stronger and lower-profile but require correct cable length at fabrication.
- Tensioners: Turnbuckle, threaded stud-and-jaw, or fixed swaged terminal with tension nut. Choose based on the architectural intent, turnbuckles are visible, threaded studs hide inside the post.
- Intermediate guides: Holes drilled in intermediate posts at the cable elevation, with stainless or polymer bushings to protect the cable from chafing against the post wall.
Post spacing and configuration
The relationship between post spacing, cable tension, and cable deflection drives almost every cable railing design decision:
- End-and-corner posts: Heavy structural posts (typically 2"×2" or larger HSS, or solid stainless) at every termination point. These take the full cumulative cable tension and need anchorage sized for that load, typically a minimum of M12 anchors into concrete or through-bolted into structural blocking on wood.
- Intermediate posts: Smaller posts at 4-foot spacing between end posts. These do not take the cable tension; they provide lateral support to limit deflection.
- Vertical pickets between posts: Some cable systems add 1-meter-spaced vertical stainless rods between posts, in addition to the horizontal cables, to break up long runs and reduce required cable tension. Adds material cost; reduces the structural demands on end posts.
- Cable count: For a 36-inch (914 mm) guard height with 100 mm clear spacing rule, plan on 8 to 9 horizontal cables. Higher guards (1070 mm commercial) need 11 to 12 cables.
Substrate anchorage
The end-post anchorage is where most cable railing failures originate, not the cables themselves. What we look for during the site visit:
- Concrete: Sufficient edge distance for through-anchored fixings (75 mm minimum, more for the larger anchors required by cumulative cable tension); intact reinforcement near the embedment zone; structural concrete (not topping slab).
- Wood-framed deck: Continuous structural blocking at every end and corner post; through-bolts to the framing rather than lag screws into top plates. A continuous steel angle along the deck edge is often the right detail for a serious cable railing.
- Existing balcony slab: Coring or post-installed anchors sized for the cumulative tension load; the slab edge condition has to be field-verified during quoting because retrofit cable railings on existing structures often need substrate reinforcement that wasn\'t in the original budget.
Tensioning and inspection
Cable tension is verified at installation using either a tension gauge applied to a representative cable or by torque measurement on the tensioner threads. Each cable is brought to specified tension (typically 200 to 300 lb for 3 mm cable on residential post spacing) and the system is then load-tested by applying the BCBC infill load at the most flexible point (usually mid-span on the longest cable run) and confirming deflection is under 100 mm. We document the tension values and the load test on every cable railing project.
Long-term, cable tension drifts as the cables seat into their fittings and as the building structure flexes seasonally. Annual re-torque for the first two years, then every 2 to 3 years, keeps tension in spec. We provide tensioning instructions and a tool kit with each project; for clients who would rather have us back, we offer scheduled tensioning service calls.
When cable is the right answer (and when it's not)
Good fits: View decks and balconies on mountain-modern or contemporary homes. Lake-edge and oceanfront properties. Mezzanines in industrial-modern interiors. Properties where the homeowner wants a railing that visually retreats and the budget supports the engineering.
Poor fits: Single-family stair guards in homes with toddlers (climbability concerns; pickets are usually the safer choice). Strata-required guard replacements where the strata has standardized on a different system. Tight budgets where a powder-coated steel picket railing would do the job for less. Multi-unit residential balconies where annual re-tensioning service across dozens of units becomes a maintenance burden.
Related reading
For system comparisons, see our glass railing guide, picket railing guide, and glass vs cable comparison. For city-specific service, our Vancouver cable railings page covers project-area logistics. For materials, see stainless 304 vs 316 and our materials and finishes guide.
FAQs about cable railings
What size cable is used for railing infill?
Standard cable for guard infill in Metro Vancouver is 3 mm or 4 mm 1×19 stainless steel cable. The 1×19 designation refers to the construction (one strand of nineteen wires) and produces a stiffer, smoother cable than a 7×19 construction. 3 mm cable is appropriate for runs up to roughly 3 m between intermediate posts; 4 mm is used for longer runs or where higher tension is required to pass the deflection test.
How are cables tensioned?
Each cable is anchored at one end with a swaged terminal fitting and at the other end with a tensioner, typically a turnbuckle, threaded stud-and-jaw, or fixed swaged terminal with a tension nut. The tensioner is torqued during installation to a calculated load (usually 200 to 300 lb of tension per cable for 3 mm cable on a typical residential post spacing) so that, under the BCBC infill load test, the cable does not deflect more than 100 mm and continues to resist the load. Tensioners require periodic re-torquing, see the maintenance section below.
What is the maximum post spacing for a cable railing?
The structural answer is "whatever the engineering supports." In practice, residential cable railings work best at 4-foot post spacing for end-and-corner posts, with intermediate "pickets" (vertical stainless rods) at 1 m on centre between structural posts. Without intermediate pickets, the post spacing has to drop to roughly 3 feet to keep cable deflection under the 100 mm sphere requirement. The interaction between post spacing, cable tension, and cable deflection is calculated against the 0.5 kN infill load.
Do horizontal cables count as a "climbing aid" under BC Building Code?
BCBC 9.8.8.6 prohibits horizontal members between 100 mm and 900 mm above the walking surface that could be used as a climbing aid where children are likely to be present. The interpretation of whether tensioned horizontal cables qualify as a climbing aid varies by municipality. Our experience: most Metro Vancouver inspectors accept properly tensioned 3 to 4 mm 1×19 stainless cables as not constituting a climbing aid, but some inspectors require either vertical cable orientation or vertical pickets in residential applications with children. Confirm with your local building department before specifying horizontal cables on a residential single-family stair or balcony guard. See <a href="/custom-railings/bc-building-code/">our BC code reference</a> for the full discussion.
What grade of stainless is used in cable railings?
316 stainless for the cables, end fittings, and tensioners on any exterior installation, and for any interior installation in a humid environment (poolside, indoor pool deck). 304 stainless is acceptable for dry interior applications. For waterfront and salt-air-exposed properties, 316 is mandatory, 304 will pit and stain within a few years even on a covered exterior balcony. See the <a href="/news/stainless-steel-railing-304-vs-316-vancouver/">304 vs 316 stainless guide</a> for the full discussion.
Do cable railings rust?
Properly specified 316 stainless cable, fittings, and posts develop a thin, self-passivating oxide layer that resists corrosion for the life of the building. What does fail: 304 stainless used in a 316 application; mild steel posts paired with stainless cables (the steel posts rust and bleed onto the stainless); aluminum hardware in a chloride-rich environment without corrosion-resistant coating. Use of incompatible metals, galvanic mismatches, accelerates corrosion at the connection points and is the single most common cause of "rusty cable railings" we are called to replace.
Can cable railings be powder coated?
The cables themselves should not be coated, the smooth polished stainless surface is part of the system. Posts and top rails can be powder coated, often in matte black or charcoal grey, to match an architectural palette. The tensioning hardware is best left as polished or brushed stainless because the threads have to remain free for periodic re-torquing.
How much does a cable railing cost?
Cable railing falls in the mid-tier of railing systems, more expensive than a basic steel picket railing of the same length, less expensive than a frameless glass system. The cost driver is the hardware count: every cable run requires a swaged terminal at one end, a tensioner at the other, and intermediate cable guides if the run length triggers them. Total cable count multiplied by hardware cost adds up quickly on a long balcony. <a href="/request-a-quote/">Request a quote</a> for project-specific pricing.
How are cable railings maintained?
Three maintenance items: (1) periodic re-torquing of each cable to specified tension, annually for the first two years, then every 2 to 3 years; (2) seasonal inspection for any signs of corrosion at fittings, particularly on exterior installations; (3) cleaning. For exterior cables in Metro Vancouver, plan on a quarterly fresh-water rinse to address rain spots and pollen, with a more thorough cleaning using stainless-safe cleaner once or twice a year. Salt-exposed waterfront installations need monthly fresh-water rinses to prevent pitting at the swaged fittings.
Can cables be used on stairs?
Yes, with two caveats. First, the climbability discussion above, confirm with your local building department for residential single-family work. Second, the geometry: on a stair, cables run parallel to the stair pitch, which means each cable rises along the stair angle. The post-to-post distance changes when measured along the cable rather than horizontally, and the tensioning has to account for the angled run. Stair cable railings are slightly more expensive per linear foot than level decks because the geometry adds fabrication and tensioning complexity.
How long do cable railings last?
Properly specified 316 stainless cable railings have a service life equivalent to the building they're installed in, 50+ years with maintenance. The mechanical components (tensioners, swaged fittings) may need refreshing or replacement at the 20 to 30 year mark depending on environmental exposure. The cable itself, with proper periodic re-torquing, remains structurally sound for decades.
Get in touch
Need a fabrication quote?
Send drawings, photos, or even a rough description. We will review what you have and follow up with a quote or a conversation about next steps.