Homeowners ask the same questions before installation day. How long will the work actually take? What will the crew do? How loud is it? Will it smell like welding? What happens if something does not fit?
This post is the honest fabricator’s answer to those questions, based on a decade of installing mono stringer staircases across Metro Vancouver. It is not marketing, it is the practical walkthrough we wish every homeowner had before the install crew arrives.
Two weeks before installation
Installation day starts long before the crew shows up. Two weeks out, we are:
- Confirming the site is ready, framing is complete if new construction, demolition done if retrofit, adjacent rooms prepped for staging
- Shipping completed steel to the finisher (if the stair goes out for galvanizing, duplex coating, or specialty powder coat)
- Coordinating tread delivery from the millwork shop
- Scheduling the crew and confirming logistics
The homeowner’s side of this two-week window is usually:
- Completing any preceding trades (electrical rough-in above the stair, drywall finishing, flooring installation, depending on project sequence)
- Moving furniture and cleared items out of the stair zone and adjacent rooms
- Confirming access, driveway clear, entry door accessible, any security codes shared with the foreman
A week out, we do a final check call or visit. If anything has changed on site (framing revisions, finish decisions, schedule shifts), this is when we find out and adapt.
The day before
The day before installation, we deliver the steel to site. On most projects this happens mid-afternoon, a flatbed truck drops the stringer, brackets, railing posts, and hardware at the site. The crew stages the materials either in an attached garage, a driveway with cover, or (on protected sites) inside the work area.
Tread delivery happens separately from the millwork shop, usually on installation day 1 or 2 depending on tread type. Hardwood treads are staged in the house to acclimate to interior conditions before installation. Glass and stone treads come directly from the supplier to the installation site.
The homeowner’s job the day before: clear the final path from the front door to the stair zone. Remove breakables from adjacent spaces. Confirm any pets are secured or off-site for the install days.
Installation day 1, the stringer
Day 1 is almost always stringer day. The crew arrives around 8:00 AM, introduces themselves, walks the foreman through any last-minute coordination, and stages the work area.
First hour: site prep. Floors covered with rosin paper and plastic, dust containment established, power outlets confirmed for tools, work lighting set up if the space needs it.
Hours 2 to 3: base plate and top connection prep. The bottom base plate of the stringer anchors into concrete (ground floor slab, garage, or basement floor) or into reinforced framing (upper floors). Anchor bolt locations are marked, drilled (impact hammer drill), and the hardware is set. If the anchor is into post-tensioned concrete, this phase includes GPR scanning to avoid tendons. This is the loudest phase of the project, hearing protection is mandatory for the crew and recommended for the homeowner if they are in the house.
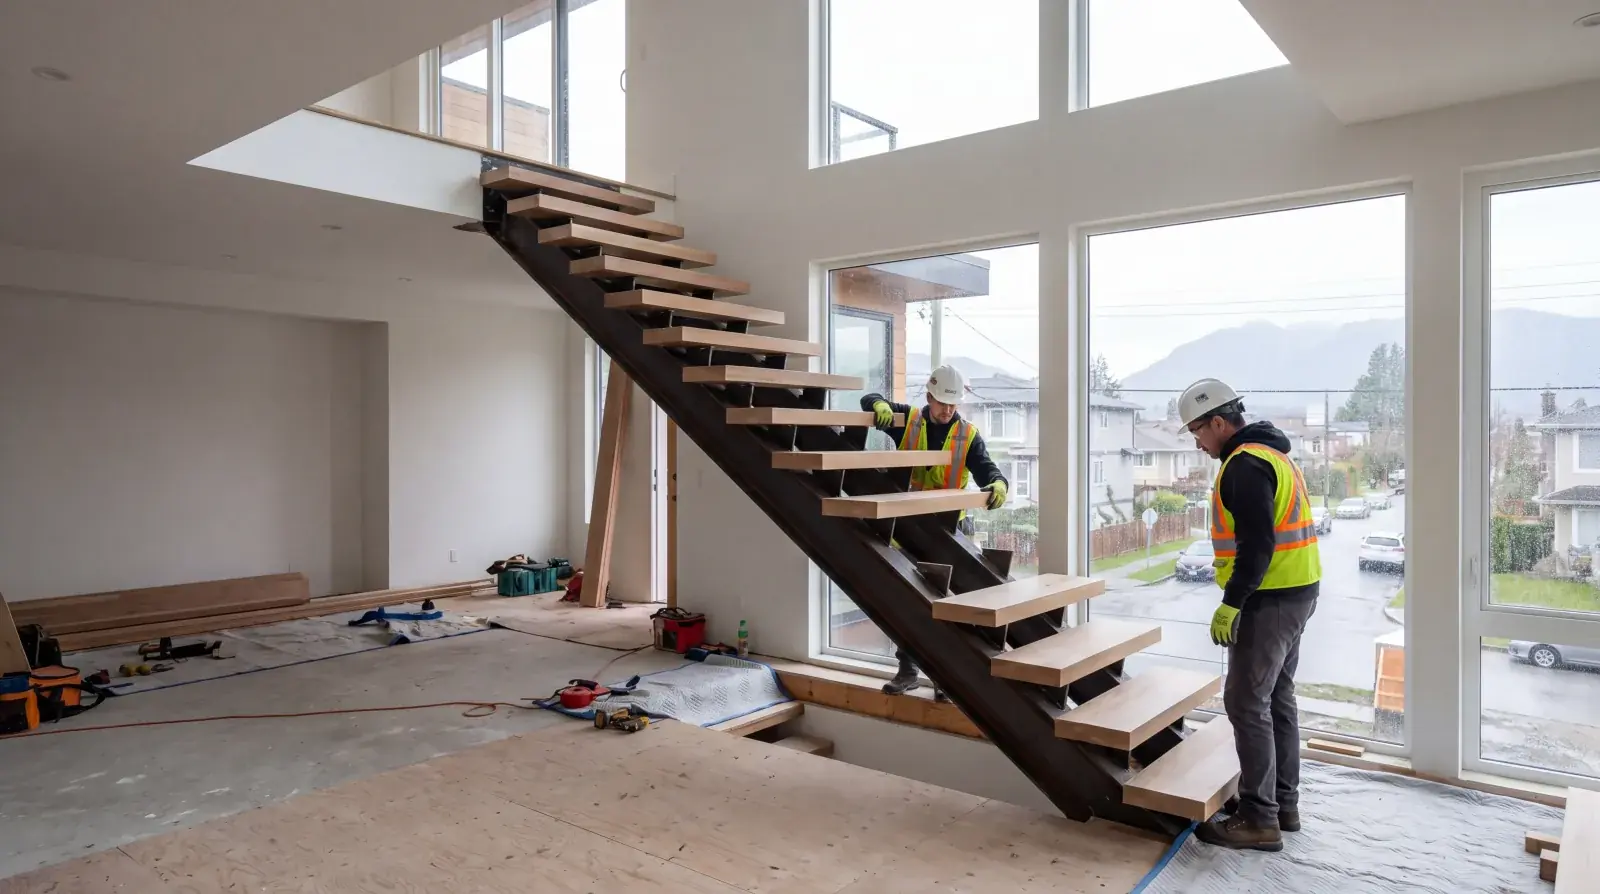
Hours 3 to 5: stringer placement. The main steel beam is positioned using come-alongs, temporary bracing, and sometimes a small mechanical lift (a stair climber or hydraulic platform) for longer beams. The stringer weighs 150 to 400 lbs for a typical residential beam; larger beams for longer spans or heavier tread loads can weigh more. Three crew members handle placement on most residential jobs.
Hours 5 to 6: bolting and plumb-check. Once the stringer is positioned, bolts are installed at the base and top connections. The foreman uses a digital level to plumb the stringer in both directions, the stair geometry depends on this being exact. Shimming happens if needed.
Hours 6 to 7: tread bracket pre-check. All tread brackets are checked against the shop drawings. Any minor alignment adjustments (loosening and re-tightening bolts through slotted holes) happen now before treads are installed.
End of day 1: The stringer is in place, plumbed, bolted, and ready for treads. The homeowner can walk up it (we do, multiple times, it is how we confirm the connections are solid). Cleanup, debris removal, tool stage for day 2.
Installation day 2, treads
Day 2 is tread day. The crew arrives with the treads either already on site (for hardwood) or arriving mid-morning (for glass or stone).
Hours 1 to 2: bracket final prep. Each bracket receives a final sanding and touch-up of any finish imperfections. Tread contact surfaces are cleaned. Gaskets or isolation pads are positioned on each bracket.
Hours 2 to 5: tread installation. Each tread is lifted into position, levelled on its bracket pair, and bolted from below with countersunk fasteners. The first tread sets the starting reference; each subsequent tread references off the one below it. We use a digital level on every tread to catch any cumulative error before it becomes visible.
Hours 5 to 6: tread final check. All treads are checked for level across, level front-to-back, consistent nosing projection, and consistent gap to the stringer. Minor adjustments (shimming, loosening and re-tightening) happen now.
End of day 2: All treads are installed. Railing is not yet up, so the stair is not usable as a full stair, we set temporary barriers at the top and bottom to prevent use. Walking on the installed treads during the remainder of installation is normal for the crew but should be avoided by the household.
Installation day 3, railings and finish
Day 3 is railing day on most projects. Cable, glass, or steel rod railings go in, along with any handrail and final adjustments.
Hours 1 to 3: posts and handrail. Railing posts are installed at each tread (typically every 2 treads for cable infill, every 3 treads for glass panels), plumbed, and bolted. Handrail brackets are set. The handrail itself, usually a steel bar or wood cap, is installed and attached to the posts or to wall brackets.
Hours 3 to 5: infill. Cable rails are run through each post and tensioned to spec. Glass panels are set into their mounting hardware and adjusted for consistent gap. Steel rod or bar infill is welded or bolted in place (typically bolted on site, pre-welded when possible).
Hours 5 to 6: final adjustment and touch-up. Every connection is checked. Any finish touch-up is applied, a small powder coat touch-up kit handles any scratches or minor dings from installation. Hardware is tightened to spec.
Hours 6 to 7: cleanup and walkthrough. Work area is cleaned, all materials and tools removed, floor protection pulled up. The foreman walks the homeowner through the finished stair, how to maintain it, any settling-in expectations, warranty period, contact for service.
The homeowner signs off on installation acceptance. That triggers warranty coverage and final invoice.
What about retrofits with demolition?
Retrofit projects, where an existing staircase is being removed to make room for a new mono stringer, add a demolition phase to the front of the installation schedule. This is the messiest and most disruptive part of the project.
Day 0 (demolition day): The existing stair is removed. Wood-framed stairs demo with hand tools (sawzall, pry bars) and generate significant debris. Dust containment is established with floor-to-ceiling plastic at all adjacent openings. HEPA-filtered vacuums run continuously. The old stair material is removed from the site and disposed of.
Day 0.5 (structural work): If framing reinforcement is specified, this is when it happens. New headers, joist reinforcement, base plate reinforcement pads, all installed now, before the new stair goes in.
Days 1 to 3 (new stair installation): The same sequence as new construction.
On most retrofit projects, the homeowner stays elsewhere during the demolition day and returns for the stair installation. The demolition is contained but the dust and noise are real. Living with it is possible, we have done projects where the household stayed through everything, but most clients appreciate the break.
See the installation guide for retrofit scenarios in more depth.
What can go wrong
Honest answer: sometimes things do not fit perfectly on the first try.
Field dimension discrepancies. We measure the site before shop drawings, and the shop drawings drive fabrication. Occasionally the site has changed between our measurement and installation, framing revision, finish flooring installed at a different thickness than expected, or an oversight in coordination. We handle these case-by-case: sometimes a field shim solves it, sometimes a small field modification, occasionally a piece goes back to the shop for adjustment. Honest communication with the homeowner is always our first move.
Concrete substrate problems. When we drill for anchor bolts and hit rebar, aggregate, or a void, we reposition or use an alternative anchor detail. This adds time but is not a project stopper.
Coordination with other trades. On new construction, occasionally the GC changes a schedule and we arrive to find adjacent trades still working in the stair zone. We work around, but it slows us down. Clear communication with the GC the week before avoids most of this.
Finish damage. Even with careful handling, a newly powder-coated piece of steel can get a small scratch during transport or installation. We bring powder coat touch-up materials that match the factory finish almost perfectly. For serious finish damage, we pull the piece and refinish it rather than patch.
Daily life during installation
A few practical items for the homeowner:
- Work hours are typically 8 AM to 4 PM, with a lunch break around noon
- The crew uses their own vehicles and own tools, no household tools or supplies needed
- Crew can use the nearest washroom, or we bring portable facilities for longer projects
- Music, TV, etc. in adjacent rooms is fine if the crew is not doing loud work, check with the foreman
- Pets should be secured or off-site during working hours
- Children should not be in the work area at any time
The crew foreman is the single point of contact throughout. Any questions, concerns, or requests go through the foreman, not individual crew members. This keeps the work focused and avoids mixed signals.
After installation
After sign-off, the stair is fully functional and warranted. A few care notes for the first few weeks:
Finish settling. Powder coat finishes are fully cured when they leave the coating shop. No cure time after installation. Hardwood finishes (oil, hardwax, polyurethane) typically need 24 to 48 hours before heavy cleaning or full use.
Settling sounds. A properly installed mono stringer should not make settling sounds. If you hear any creaking or groaning in the first week, document it and contact us, it likely means a connection needs minor adjustment, which we handle as warranty service.
Cable tension. On cable railings, the cables should hold tension for years. A minor re-tensioning at 6 months is typical as cables settle slightly. We do this as a warranty service call.
Cleaning. Steel finish cleans with a soft cloth and mild soap-water. Avoid abrasive pads on powder coat. Wood treads clean per the millwork shop’s finish instructions, usually a damp microfiber for routine cleaning.
The bottom line
Installation day for a mono stringer staircase is organized, predictable, and (if planned well) low-drama. Two to three days of work, a small crew, moderate noise, contained mess, and a finished stair at the end.
Projects go wrong when coordination breaks down, unclear schedules, missed measurements, poor communication between architect, engineer, GC, and fabricator. Projects go right when the people involved know what they are doing and keep each other informed.
If you are planning a mono stringer installation in Metro Vancouver and want to understand what installation day will actually look like for your specific project, request a quote or contact our Burnaby shop. We will walk through the schedule, crew plan, and prep list for your space.