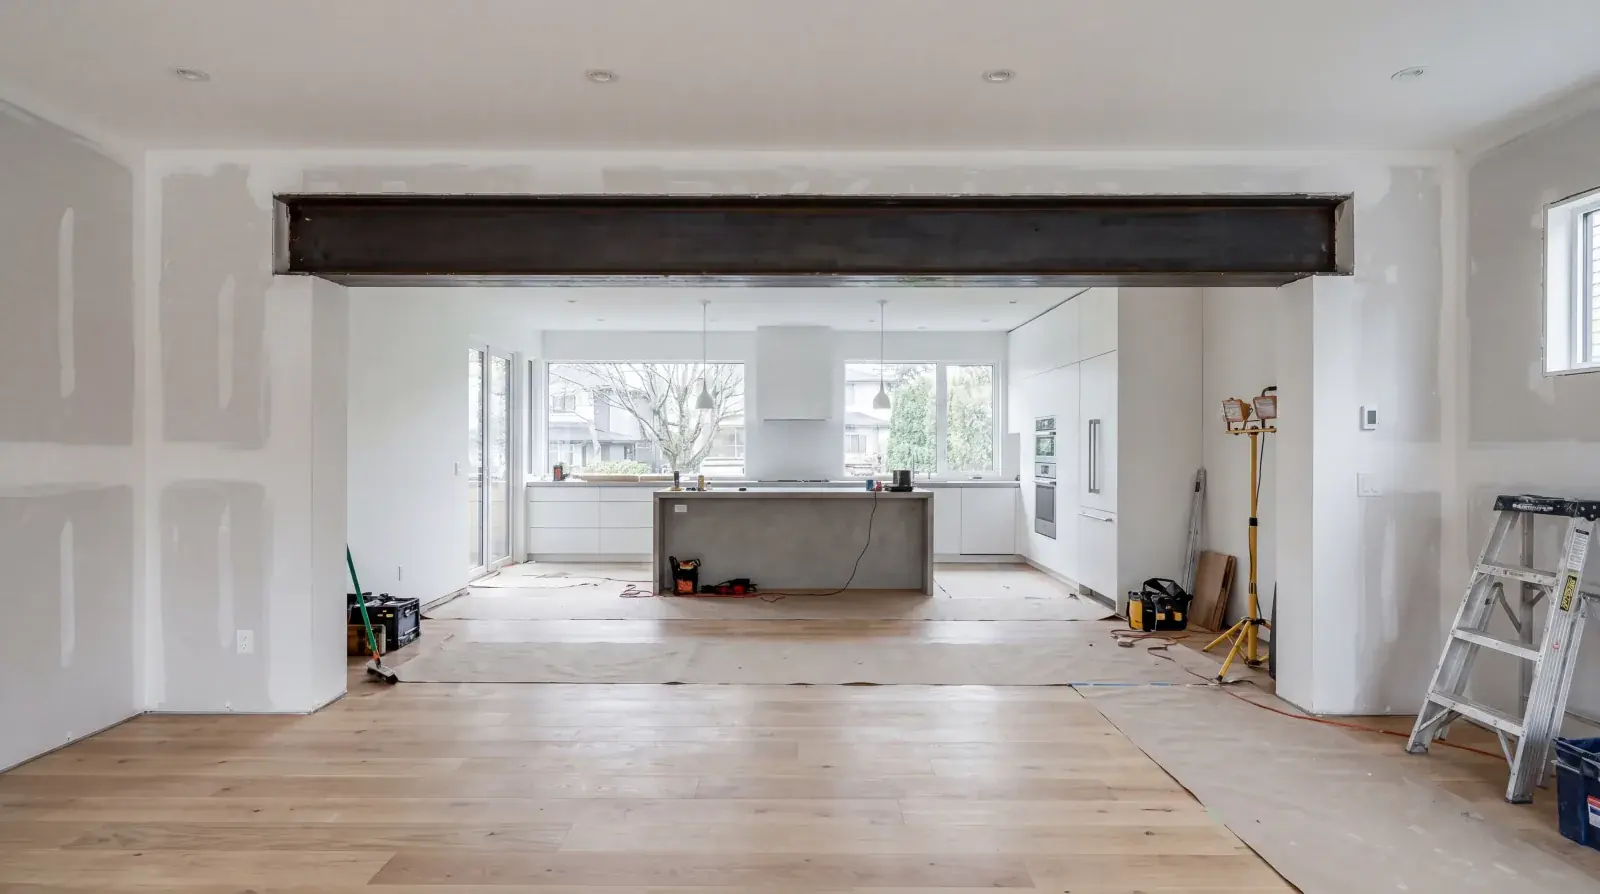
Opening up a load-bearing wall is the most common structural steel call we get from Metro Vancouver homeowners. The motivation is almost always the same, a 1970s or 1980s kitchen that is separated from the dining room by a wall that should not have been there in the first place, and the owner wants an open-concept space that matches how they actually use the house. Sometimes it is removing a wall between the living room and a formal dining room. Occasionally it is a more ambitious project combining three smaller rooms into one large space.
The steel beam that replaces the wall is a minor part of the total project in some ways, just a piece of fabricated steel, but it is the element that makes the whole renovation possible, and the engineering, permitting, fabrication, and installation process involves more moving parts than most homeowners expect before they start.
Here is the full picture of what a load-bearing wall removal with a steel beam actually involves in 2026, what it costs, and how to plan for the parts most people do not see coming.
The full project scope breakdown
A residential load-bearing wall removal with steel beam installation in Metro Vancouver has multiple line items. Every project is quoted per project, the scope includes:
| Scope component | Notes |
|---|---|
| Structural engineering and drawings | P.Eng. sealed drawings required for permit |
| Permit fees and plan review | Varies by municipality and project value |
| Temporary shoring during work | Supports loads while wall comes out |
| Wall demolition | Including debris removal |
| Steel beam fabrication and supply | Wide flange section, cut to length, holes and plates |
| Beam delivery and rigging | Larger beams need crane or hoist |
| Installation labour | Placement, welding/bolting connections, column supports |
| Electrical and plumbing relocation | If services run through the wall |
| HVAC duct modification | If supply/return in the wall |
| Drywall, finishing, and paint | Patching the opening and surrounding areas |
Straightforward residential projects in Metro Vancouver, a 10 to 14 foot opening in a single-storey interior wall with no mechanical or plumbing complications, sit at the baseline. Larger openings, multi-storey load paths, and complications push into the premium tier. Request a quote for pricing on your specific scope.
The engineering step you cannot skip
Every load-bearing wall removal in British Columbia requires a structural engineer’s sealed drawings. This is not optional, not negotiable, and not something a good fabricator or contractor will try to work around. BC Building Code and every municipal building department in Metro Vancouver require engineered documentation before a permit is issued for structural changes to a residential building.
What the engineer does:
-
Site visit to assess the existing structure. The engineer looks at the wall to be removed, the supporting structure above (joists, rafters, upper walls), the bearing points where the new beam will land, and the foundation or bearing wall below. This visit usually takes 1 to 2 hours and is billed as part of the overall engineering fee.
-
Load calculation. Determines exactly what the wall is carrying, live load from occupants, dead load from the structure above, snow loads from the roof if applicable, seismic loads per BC Code requirements. Residential load calculations follow NBC (National Building Code) Part 9 methods for most situations.
-
Beam sizing. Selects the appropriate wide flange (W-shape) beam based on the span, load, and deflection limits. Residential beams typically range from W8x15 (small single-storey openings) to W14x53 or larger (wide spans carrying multiple storeys).
-
Connection design. Specifies how the beam attaches to the supporting columns or walls at each end. This can include steel baseplates, welded connections, through-bolted connections, and any reinforcement needed at the bearing points.
-
Temporary shoring specification. Tells the installers how to support the loads above during the wall removal and beam installation, typically a series of temporary posts and beams that carry the loads until the new permanent beam is in place.
-
Sealed drawings. Produces the formal drawing set stamped and signed by the P.Eng. for permit submission.
Engineering scope tiers in Metro Vancouver:
- Simple single-storey opening, standard construction: baseline scope
- Two-storey load path with straightforward connections: mid-range scope
- Multi-storey, shear wall implications, or complex load redirection: premium scope
- Non-standard construction, heritage building, or unusual geometry: top-tier scope
Engineering is billed by the structural engineer directly and is roughly 10 to 20% of the total project cost on a typical residential job. It is the least glamorous line item and the one homeowners most often try to cut, but the structural engineer is the person who makes sure the house does not deflect or fail when the wall comes out. Their fee is the cheapest insurance you will ever buy on this kind of project.
Permit process in Metro Vancouver
Once you have engineered drawings, the permit application goes to the municipal building department where the home is located. Process and timelines vary:
City of Vancouver. Residential structural permit applications typically take 2 to 4 weeks for plan review. Fees are based on project value, confirm current rates with the City of Vancouver. Vancouver requires electronic submission through their online portal and has specific documentation requirements for structural work.
City of Burnaby. Similar process, typically 2 to 3 weeks for review. Fees vary by project value. Burnaby’s building department is generally efficient and communicative during review.
Coquitlam, Port Moody, New Westminster, Port Coquitlam. 2 to 5 weeks review depending on workload.
District of North Vancouver, City of North Vancouver, West Vancouver. 3 to 6 weeks review. North Shore municipalities sometimes have stricter requirements around seismic design documentation.
Surrey, Delta, Richmond. 2 to 4 weeks.
Across all municipalities, the permit must be issued before any structural work begins, and an inspection is typically required after installation before the work is signed off. Some jurisdictions also require an engineer’s field review letter confirming the installation matches the sealed drawings.
Fabrication: what the beam actually is
The steel beam in a residential load-bearing wall removal is almost always a wide flange section, what structural engineers call a W-shape. These are I-beam cross sections rolled from mild steel to standard profiles set by the Canadian Institute of Steel Construction (CISC).
Common residential beam sizes:
- W6x20 to W8x18: small openings (6 to 10 feet), single-storey loads, light residential applications
- W10x19 to W10x26: medium openings (10 to 14 feet), standard two-storey residential
- W12x22 to W14x34: larger openings (14 to 20 feet), two-storey with roof load
- W14x43 to W18x50: wide spans or heavy loads, less common in residential
The first number is the nominal depth (6, 8, 10, 12, 14, or 18 inches). The second number is the weight per foot (20, 26, 30, etc.). A W10x26 is a wide flange beam approximately 10 inches deep that weighs 26 pounds per linear foot.
Fabrication scope. At our Burnaby shop we receive the raw W-section from a local steel supplier, cut it to the exact length specified in the engineered drawings, drill or burn any holes required for connection hardware, weld on baseplates or end plates as needed, and clean up any shop marks. For residential beams, shop priming with a rust-inhibiting primer is standard. Galvanizing is rare unless the beam will be exposed to moisture.
Fabrication scope for a residential beam includes raw material plus shop labour. The beam material varies with weight and length; shop labour for cutting, drilling, welding end connections, and priming scales with complexity. Every beam is quoted per project.
Lead time for residential beam fabrication is typically 1 to 2 weeks from approved drawings. Beams that require special rolling or heavy end-plate welding can take longer.
Installation day: what actually happens
On the day (or days) the beam goes in, the sequence is carefully choreographed to keep the house structurally supported throughout. Here is what a typical residential installation looks like.
Morning: Temporary shoring. Before any part of the existing wall comes out, temporary support columns are installed a few feet away from the wall on each side, with horizontal members spanning between them to carry the floor joists above. The shoring has to be strong enough to carry the loads that the wall was carrying, this is specified by the engineer.
Morning: Wall demolition. Once the temporary shoring is in place and checked, the existing wall framing comes out. Drywall, studs, top and bottom plates, any electrical or plumbing that was removed in advance. If services remain in the wall, the demolition has to work around them carefully.
Midday: Beam delivery and rigging. The fabricated beam arrives on site. For smaller beams (under 500 pounds), a crew of 3 to 4 people can carry and position by hand. Larger beams need a forklift, crane, or beam dolly. On some Metro Vancouver homes, particularly in tight lots, beam delivery requires removing a window or door temporarily to get the beam into the house.
Afternoon: Beam placement and connections. The beam is lifted into position on top of temporary supports, then bolted or welded to the new bearing columns or walls at each end. The temporary shoring continues to carry load until the connections are complete and verified.
Afternoon: Load transfer. Once the connections are complete and the engineer’s inspection confirms the installation matches the drawings, the temporary shoring is removed. The floor loads above now transfer through the new beam to the bearing points.
Following days: Finishing. Drywall patching, trim, ceiling repair, flooring transitions, paint, and any cosmetic work to integrate the new opening with the surrounding spaces. This is usually handled by a general contractor or specialty finisher rather than the steel installer.
A typical single-day installation covers the morning through afternoon steps. Larger projects or those with complications can take 2 to 3 days.
The hidden costs homeowners miss
The line items above are the known costs. These are the ones that sneak into most Metro Vancouver projects and catch homeowners off guard.
Asbestos and lead paint. Any home built before 1990 in BC should be tested for asbestos before structural demolition. Textured ceilings, drywall mud, insulation, and flooring adhesives can all contain asbestos. Testing and, if positive, abatement are billed by the abatement contractor and scale with scope. Lead paint on older baseboards and trim is less common but needs similar handling if present.
Electrical relocation. Walls frequently have outlets, switches, and wire runs embedded in them. Relocating these before the wall comes out is a separate electrician’s job, billed based on how many circuits are affected and how far the wires need to go.
Plumbing relocation. Less common but possible, walls occasionally contain drain lines from an upstairs bathroom or vent stacks. Relocating plumbing involves coordination with a licensed plumber and is billed separately.
HVAC ductwork. Return air chases often run through interior walls. Relocating a return or supply duct is billed by the HVAC contractor and depends on the scope.
Foundation reinforcement. If the new beam places concentrated loads at points where the existing foundation is marginal, the footings at the bearing points may need to be enlarged or reinforced. This is rare but is a meaningful add when required.
Original construction quality issues. Renovations on 1960s, 1980s Metro Vancouver homes sometimes reveal that the original framing was undersized, improperly connected, or modified by previous owners in ways that compromise the current load path. Addressing these issues is outside the scope of the wall removal project but is sometimes required to get the permit approved.
Schedule impact. The renovation cannot proceed on the affected area until the beam is in place. If the wall removal is part of a larger renovation project, the beam schedule affects everything downstream, flooring, cabinets, paint, fixtures. Delays on engineering or permit review ripple through the whole project.
Budget 15 to 25% contingency on the initial project estimate for these categories, held in reserve for surprises.
Choosing between flush and dropped beams
One design decision shapes the rest of the project: does the new beam sit flush with the ceiling (hidden) or drop below it (exposed)?
Flush beam means the beam is installed at the same level as the existing floor or ceiling joists, with joists hanging off the beam via face-mount joist hangers. The underside of the beam is level with the underside of the joists, and when drywall is installed, the ceiling appears flat and continuous. No visible beam from below.
- Cost: higher. Flush installation requires additional connection hardware (joist hangers, sometimes doubled joists at the beam), more install time, and tighter tolerances.
- Ceiling height: unchanged. The room below the beam has the same ceiling height as before.
- Visual: invisible. No indication from below that a beam is there.
- Typical premium over dropped beam: a meaningful add on a residential project, quoted per scope.
Dropped beam means the beam sits below the existing joists or ceiling. Joists rest on top of the beam in a standard bearing connection. The beam is visible as a drop below the ceiling level, typically 8 to 14 inches depending on beam depth.
- Cost: lower. Simpler connections, faster install, standard hardware.
- Ceiling height: reduced by the beam depth in the local area around the opening.
- Visual: visible. Often wrapped in drywall (appears as a soffit), wood trim (architectural feature), or left as painted steel for industrial aesthetic.
For most Metro Vancouver kitchen/dining renovations, the decision comes down to ceiling height and aesthetic preference. Homes with 8-foot ceilings often choose flush to avoid reducing height in the opening area. Homes with 9-foot or higher ceilings can often absorb a dropped beam without impacting the space feel. Modern and industrial design projects sometimes choose exposed steel as an intentional feature.
When the project gets more complicated
Several conditions make a load-bearing wall removal more complex and expensive than the typical ranges above:
Multi-storey load paths. If the wall being removed supports loads from two storeys above (plus attic or roof), the beam has to be sized for the cumulative loads. These beams are heavier (W14 or W18 range), require stronger bearing points, and sometimes need auxiliary columns or supports at the ends to redirect loads into the foundation.
Shear wall implications. In some Metro Vancouver homes, particularly post-1990 construction, the wall being removed is part of the lateral force resisting system (shear walls that resist earthquake and wind loads). Removing the wall requires replacement shear capacity elsewhere in the structure, typically new shear walls or plywood-sheathed panels. This adds a meaningful line item to the project.
Heritage and character homes. 1920s, 1950s homes in Shaughnessy, Kitsilano, or Commercial Drive often have original framing that does not match any current construction standard. Load paths can be unclear, framing members may be undersized, and previous renovation work may have introduced unknowns. Engineering and installation on these projects takes longer and costs more, typically 40 to 70% more than a comparable modern construction project.
Exterior walls with shear or insulation concerns. Removing a section of exterior wall (as opposed to an interior bearing wall) adds complexity because the wall is carrying both structural loads and building envelope functions, weather protection, thermal insulation, vapour barrier. These projects typically involve additional trades and higher costs.
Working with our Burnaby shop on your project
At Jeff and Simon Ironworks, we handle the fabrication and installation side of residential load-bearing wall projects across Metro Vancouver. For most projects, the workflow looks like:
- Initial site visit (free) to understand the scope and discuss options
- Referral to a structural engineer if you do not already have one (we work with several residential structural engineers in Metro Vancouver)
- Fabrication quote based on the engineered drawings
- Permit assistance, providing shop drawings and material specifications for the permit package
- Fabrication at our Burnaby shop, typically 1 to 2 weeks from approved drawings
- Installation on site, coordinated with temporary shoring, demolition, and any other trades involved
- Field review, the engineer confirms the installation matches the drawings
For homeowners just starting the process, it often makes sense to get the structural engineer engaged first. They can confirm the wall is actually load-bearing (sometimes it is not), give you a preliminary beam size and project scope, and produce the drawings you need to get accurate fabrication and installation quotes. From there, we can quote the fabrication and installation side with confidence that the engineering is sound.
For more context on structural steel and our shop’s capabilities, see our steel fabrication Vancouver guide or the broader structural steel guide for BC. For projects where CWB certification matters, as it does on any sealed structural work, our CWB certified welding page explains what the certification covers and why it matters on residential structural beams.
Request a quote with the details of your project, or contact the shop to schedule a site visit. For projects in the early planning stage, we are happy to walk through the process and help you understand what to expect before you commit to the engineer.